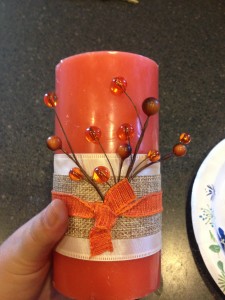
All week this week we will be featuring fun fall DIY projects. Today, our project is a festive fall candle DIY that you can make in just a few minutes. I shopped the clearance racks at my local big box store and was able to make two of these candles for a total of just $9 in supplies. Here is the tutorial on how to do it. If this project appeals to you, print out the pdf version of the instructions and take it with you to the store to have a handy shopping list and a copy of the detailed instructions. The printable version also has an added tip and variation.

DIY Fall Candle
Step 1:
Cut a length of ribbon that is an inch and a half longer than the circumference of the pillar candle. Tack one end of the ribbon to the candle with a little hot glue. Wrap the ribbon around the candle, fold over the end of the ribbon about half an inch. Glue the underside of the fold to the ribbon with another thin line of hot glue.
Step 2:
Unwrap the floral tape around the bunch of glass berries. This will allow you to separate each stem of the berries so you can choose which ones you want to use for the candle.
Make your selection of stems, hold them up to the candle, and trim the wires so that they end right at the center point in your wide ribbon. One stem at a time, take a small dab of glue and secure the stem to the center point of the wide ribbon.
Hold each in place for a moment as the glue sets. Please be sure not to touch the glue directly. It is very hot and may burn your fingers.
Step 3:
Once all of your berries are in place, cut the thinner of your two ribbons to be about six inches longer than the circumference of your pillar candle.
Wrap the ribbon around the candle and tie it into a double knot. Move your ribbon into place, making sure to cover the wire ends of your berries and secure it by placing a dot of hot glue behind the knot. If you feel it is necessary you can always add another dot of hot glue in the back of the candle but that probably will not be necessary.
Festive Fall Candle Picture Tutorial
About Philip Travers
Twitter •


 WishLists
 My Account


